
Backlighting a translucent stone countertop does not need to be overly complicated. After more than 17 years specializing specifically in architectural backlighting, we have found that one of the most reliable approaches is also one of the simplest: build the countertop as a carefully planned sandwich of layers, with each layer performing a specific function.
For most horizontal applications, our tried and tested method consists of a structural plywood subtop, custom frameless LED light panels, a clear acrylic spacer sheet and the translucent surface material above.
The objective is straightforward: provide continuous support, create a uniform illuminated surface, give the light enough separation to blend, and allow the translucent material itself to remain the visual focus.
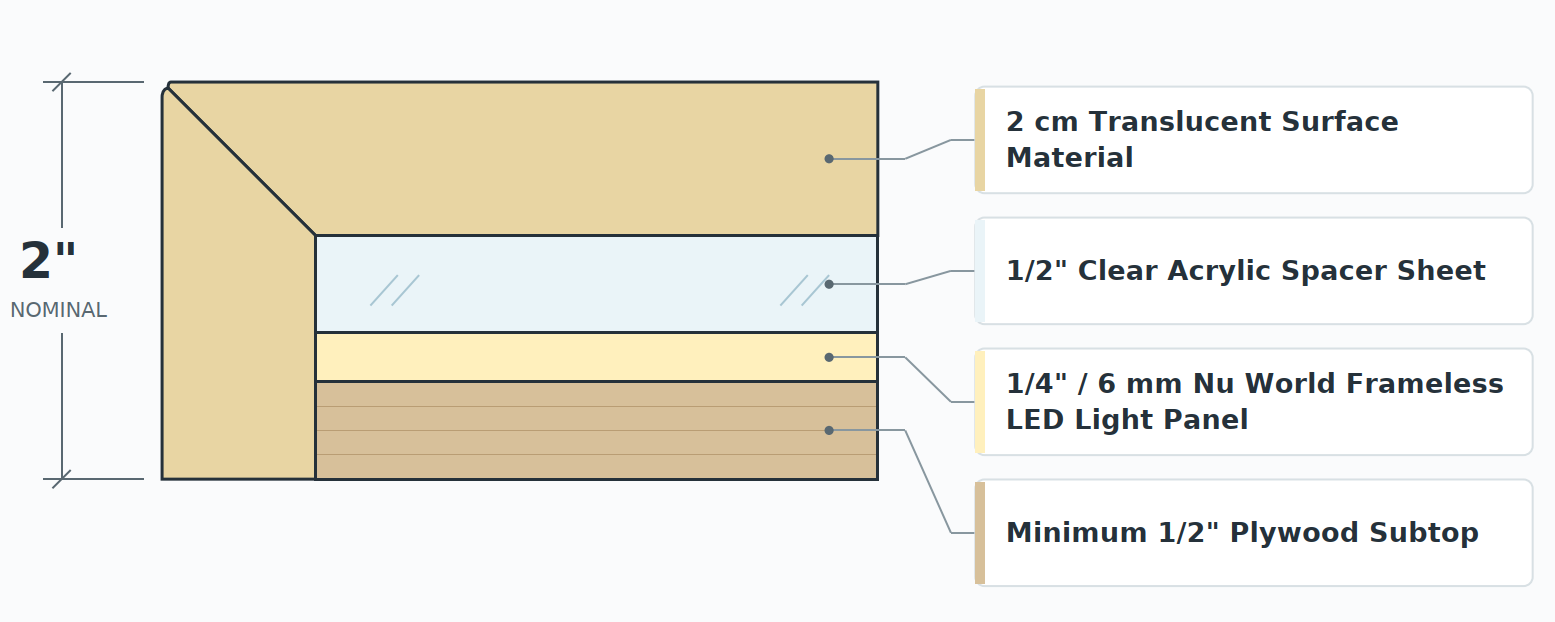
What Is the Recommended Layering for a Backlit Stone Countertop?
For a typical horizontal backlit stone installation, our recommended assembly from bottom to top is:
- Minimum 1/2″ plywood subtop
- 1/4″ / 6 mm Nu World Frameless LED Light Panel
- 1/2″ clear acrylic spacer sheet
- 2 cm translucent stone or other suitable translucent surface material
With a 1/2″ plywood subtop and 2 cm surface material, the illustrated assembly has an approximately 2″ nominal overall build-up. The listed material thicknesses total approximately 2.04″ before normal manufacturing and installation tolerances. If thicker plywood or a different stone thickness is used, the overall build-up will change accordingly.
This method can be used with suitable translucent materials including Cristallo and other translucent quartzites, onyx, selected translucent marbles and certain translucent solid-surface materials.
Layer 1: Minimum 1/2″ Plywood Subtop
The plywood subtop creates the flat, flush and continuous surface on which the LED panels are installed.
We recommend a minimum plywood thickness of 1/2″. This is a minimum rather than a required maximum. The fabricator, cabinetmaker or structural contractor may use thicker plywood where required for the countertop design, structural support, overhangs or other project conditions.
The important point from the lighting perspective is that the finished plywood surface is flat, securely supported and provides a continuous mounting plane for the LED panels.
Whenever possible, we prefer to manufacture the final LED panels from measurements taken from the completed plywood subtop rather than relying entirely on preliminary cabinet or stone drawings. This gives us the actual finished dimensions of the surface the panels will be installed on.
Layer 2: 1/4″ / 6 mm Nu World Frameless LED Light Panels
Our custom frameless LED light panels sit directly on top of the plywood subtop.
For standard fixed-white applications, the panels are only approximately 1/4″ / 6 mm thick. Rather than covering a large countertop with dozens of small lighting modules, we manufacture custom panels to suit the dimensions and layout of the individual project.
The goal is to use the least practical number of panels, wire exits and electrical connections while still creating the required illuminated area and accommodating sinks, plumbing, outlets and other penetrations.
This keeps the installation considerably simpler and helps avoid unnecessary wiring and fabrication work beneath the countertop.
What Does a Nu World Frameless LED Light Panel Look Like?
The video below shows the construction and extremely thin profile of our custom frameless LED light panels.
Layer 3: 1/2″ Clear Acrylic Spacer Sheet
The next layer is one of the most important parts of the assembly: a 1/2″ clear acrylic spacer sheet.
This acrylic contains no lighting and is not another LED panel. Its primary purpose is to create controlled separation between the illuminated LED panels and the underside of the translucent surface.
That small amount of separation gives the light an opportunity to blend before it enters the stone.
The clear acrylic spacer can help:
- Improve overall light uniformity
- Reduce visible transitions between adjacent LED panels
- Reduce hotspots and bright lines
- Provide a continuous layer beneath the finished surface
- Create a more forgiving assembly beneath highly translucent materials
This becomes particularly important with highly crystalline materials such as Cristallo quartzite, where transparent areas of the stone can reveal details beneath the surface more readily than a heavily diffused material.
Use Full Acrylic Sheets Rather Than Spacer Strips
Wherever practical, we recommend using full sheets of clear acrylic over the LED panels.
We do not recommend creating the separation layer using narrow 1/2″ acrylic strips distributed across the countertop. Although strips may physically create the required height, their exposed edges can reflect and redirect light. Through a highly translucent stone, those edges can potentially become visible as brighter lines directly above the strips.
A continuous clear acrylic sheet avoids introducing those unnecessary optical transitions and provides continuous coverage beneath the surface.
For very large countertops, the clear acrylic does not necessarily need to be one enormous sheet. Multiple pieces can be used where necessary, provided they are properly cut and fitted together. This can make sourcing, transporting and installing the acrylic considerably easier.
Layer 4: The Translucent Stone or Surface Material
The finished translucent surface sits above the clear acrylic spacer.
The illustration above shows a typical 2 cm stone, but the exact material and thickness will depend on the project.
Suitable materials may include onyx, Cristallo quartzite, other translucent quartzites, selected marbles, architectural surfaces and certain translucent solid-surface products.
Not every slab—or even every slab sold under the same stone name—will transmit light in the same way. This is why the surface material should be evaluated as part of the lighting design rather than assuming that a particular stone name automatically guarantees a particular result.
Why Not Install the Stone Directly on the LED Panels?
It is tempting to eliminate the acrylic spacer and place the stone directly against the LED panels. In some applications that may physically be possible, but highly translucent materials can reveal panel transitions, illuminated edges or other variations beneath the stone.
The 1/2″ clear acrylic layer creates a small blending zone between the light source and the finished material.
Think of it as allowing the light to mix before it reaches the stone.
The result is a simple assembly without introducing an unnecessarily deep cavity or complicated support system.
The Key Design Principle
CONTINUOUS SUPPORT + UNIFORM LED ILLUMINATION + CONTROLLED SEPARATION + TRANSLUCENT SURFACE
That is the basis of our tried and tested horizontal backlighting method.
There is no benefit in making the assembly more complicated than it needs to be. Each layer has a specific purpose, and when those layers are planned together, the physical installation becomes relatively straightforward.
Final Measurements Should Come From the Plywood Subtop
Whenever the project allows it, we recommend installing the cabinetry, structural support and plywood subtop before taking the final LED panel measurements.
The completed plywood gives us a reliable reference for the actual surface the panels need to cover.
Final information should identify:
- Overall outside dimensions of the illuminated area
- Sink location and approximate cutout dimensions
- Faucet locations
- Pop-up outlets
- Plumbing penetrations
- Other significant openings or obstructions
For projects that need to enter production before all of these details are finalized, we can often begin planning from preliminary dimensions and hold final manufacturing until the field measurements are confirmed.
Planning LED Panels Around Sinks and Other Cutouts
Sink cutouts, faucets and other penetrations are common in illuminated countertops and are not inherently a problem. They simply need to be considered when determining the panel layout.
Wherever possible, we arrange the LED panels so that a joint between two panels does not pass directly through a major sink or other critical opening.
Because our panels are edge-lit, the central area does not contain a grid of LEDs running across the surface. Suitable internal openings can therefore be incorporated during manufacturing or, in many situations, cut in the field after the intended location has been confirmed with Nu World.
The illuminated outside edges of the LED panels must not be field-trimmed.
For more detailed information about sinks, voids and unusual panel shapes, see our guide to cutouts and custom shapes for LED backlighting panels.
How Is the Wiring Routed?
With a custom panel layout, the wiring is normally much simpler than many people initially expect.
Each panel has a lead wire that can be passed through a small opening in the plywood subtop into the cabinetry below. Electrical connections and power supplies can then remain accessible beneath the countertop.
Large routed channels throughout the plywood are generally not required with our custom panel layouts.
One of our design objectives is to reduce the number of separate lighting panels wherever practical. Fewer panels generally means fewer lead wires, fewer electrical connections and a simpler installation.
Power supplies and other serviceable electrical components should always remain accessible after the stone has been installed.
How Does the Layering Work With a Mitered Stone Edge?
A mitered stone edge is a very common way to conceal the complete backlighting assembly.
The vertical mitered edge can hide the plywood subtop, 1/4″ LED panel and 1/2″ clear acrylic spacer, allowing the finished countertop to appear substantially thicker while keeping the lighting components out of sight.
In many applications, a separate vertical LED panel is not required inside the mitered edge. The appropriate illuminated edge of the horizontal LED panel can provide light directly into the mitered stone edge.
This is another example of where we prefer not to add lighting components unless they are actually necessary.
It is worth noting that the extreme outside corner of a 45-degree stone miter can occasionally appear slightly darker than the main horizontal surface. The geometry of the miter, adhesive within the joint and characteristics of the stone itself can all influence how light travels through that corner.
Natural Stone Will Not Illuminate Like a Manufactured Diffuser
One of the most important things to understand about backlighting natural stone is that the stone itself is not optically uniform.
Veining, fissures, mineral deposits, crystalline areas, resin, mesh backing, adhesives and variations in thickness can all change the amount of light that passes through different areas of the slab.
This means a stone can contain brighter and darker areas even when the LED lighting underneath it is uniform.
That variation is not necessarily a flaw in the lighting system. In many cases, it is simply the natural structure of the stone becoming visible because light is now passing through it.
This is especially noticeable with materials such as Cristallo quartzite and onyx, where translucency can change dramatically across a single slab.
Test the Actual Stone Before Finalizing the Backlighting
Whenever possible, we recommend testing the actual slab—or at minimum a representative sample—before the lighting system is finalized.
Two slabs sold under exactly the same stone name can transmit very different amounts of light. Even within one slab, some areas may be highly translucent while others may transmit very little light.
Testing helps establish how the material reacts to illumination and can identify unusually transparent areas before the final installation is built.
Our guide on how to test stone for backlighting explains this process in more detail.
Does This Layering Method Work With Cristallo Quartzite?
Yes. Cristallo is one of the materials for which controlled separation and careful panel layout are particularly useful.
Some areas of Cristallo can be extremely crystalline and transparent, which means the material may reveal considerably more of what is happening beneath it than a more diffused stone.
The combination of custom LED panels and a clear acrylic spacer helps create a more controlled lighting assembly beneath the stone while keeping the overall countertop build-up relatively shallow.
You can see an example of this type of application in our dual backlit Cristallo quartzite kitchen island project in Braselton, Georgia.
Can the Same Method Be Used for Onyx and Marble?
The same basic principles can be applied to many horizontal translucent surfaces, but the exact lighting behavior will depend on the material.
Onyx can range from relatively diffused to extremely translucent. Marble varies just as significantly, and many marbles are not translucent enough to produce a useful backlighting effect at all.
The correct approach is therefore not simply to choose a stone category and assume the result. Test the actual material, understand its translucency, and then design the lighting and layering around it.
For material-specific information, see our pages on backlighting onyx and LED backlighting for translucent marble.
Keep the Installation Simple
Backlit stone is unusual enough that contractors sometimes assume the installation must involve a complicated lighting structure beneath the countertop.
In practice, the horizontal assembly can be understood as a simple sandwich:
Plywood → LED panel → clear acrylic → translucent surface.
The plywood creates the mounting plane. The LED panels create the illuminated field. The clear acrylic creates separation for light blending. The translucent material becomes the finished illuminated surface.
Our approach is to simplify the system wherever possible: fewer panels, fewer wires, fewer connections and fewer unnecessary components.
The lighting still needs to be properly designed, measured and coordinated with the stone fabrication and electrical work, but the physical layering itself does not need to be complicated.
Planning a Backlit Countertop or Kitchen Island
If you are considering a backlit countertop, kitchen island, vanity, bar top or another horizontal translucent surface, it is best to involve the lighting system before the stone fabrication is completely finalized.
Nu World has specialized in architectural backlighting for more than 17 years and works with homeowners, designers, architects, stone fabricators, cabinetmakers, contractors and electricians throughout the project-planning process.
To review a project, send us:
- Approximate overall dimensions
- Drawings or sketches, if available
- Photographs of the stone or slab
- Sink and penetration locations
- Information about the cabinetry or support structure
- Project location for shipping purposes
We can then help determine the appropriate panel layout, layering, electrical requirements and next steps for the installation.
For additional examples, visit our Featured Backlighting Projects, or download the Nu World Backlighting Guide for additional information about planning an illuminated surface.
If you have a project you would like us to review, contact Nu World Custom Lighting and Design and send us your dimensions, drawings and material information.